Introduction:
Recently i got some few question from our blog visitors,as they want to work with already existing sqlite database file.So their requirement is they need to import existing database file to windowsphone application and then performing all Sqlite CRUID(Create,Read,Update,Insert,delete) operations.Ok lets assume from previous article we are adding some contacts into 'ContactsManager.sqlite' file like below: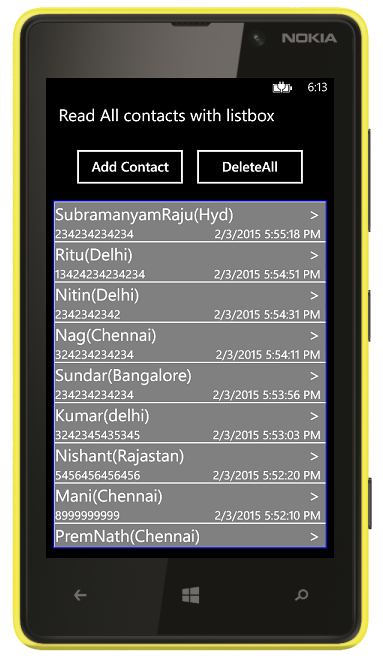
Requirements:
This sample is applicable for both windowsphone winrt and silverlight apps,so we are very happy :)
Description:
After adding some contacts from previous article ,we need to get that database (.db/.sqlite) file from local storage.Because in this article we are trying to working with existing database file.
Step 1:
Isolated Storage Explorer tool is helpful to get the database file from our application.This tool is installed under folder path is Program Files (x86)\Microsoft SDKs\Windows Phone\v8.0\Tools\IsolatedStorageExplorerTool
Isolated Storage Explorer tool is helpful to get the database file from our application.This tool is installed under folder path is Program Files (x86)\Microsoft SDKs\Windows Phone\v8.0\Tools\IsolatedStorageExplorerTool
To use Isolated Storage Explorer, the following things must be true:
- The app that you want to test must be installed on the emulator or device.
- The emulator or device must be running, but the app doesn’t have to be running.
You cannot do the following things with Isolated Storage Explorer:
- You can’t view isolated storage for apps that you’ve installed from the Windows Phone Store.
- You can’t view app settings that are stored in the local folder in Isolated Storage Explorer. These are settings that the app saved by using the IsolatedStorageSettings class.
After that execute following commands from command prompt.
1)First change command prompt directory path to Program Files (x86)\Microsoft SDKs\Windows Phone\v8.0\Tools\IsolatedStorageExplorerTool

2)Get Product Id from project WMAppManifest.xml file Packaging Tab under ProductId attribute (i.e 9748984e-2779-41fb-991f-f99c72414203)
3)if your app is run on emulator excute this command: ISETool.exe ts xd 9748984e-2779-41fb-991f-f99c72414203 c:\data\myfiles

4)if your app is run on device excute this command: ISETool.exe ts de 9748984e-2779-41fb-991f-f99c72414203 c:\data\myfiles
Now we will be found DB content in your computer at c:\data\myfiles like this.

Wow! now we have SQlite db file 'ContactsManager.sqlite'.We can open this db file with Mozilla SQLite Manager,and we will be found screen should be like this:

Note:The above step is not required,if you already having db file.it is only applicable for if you are not having db file.
Step 2:
Next step is to copy your database file(ContactsManager.sqlite) in to the Visual Studio project and, from the Properties window, set the Build action to Content.


Step 3:
Now copy it to you local folder and make connection to the database using sqlite like this:
However call above method in App.xaml.cs
Step 4:
Now we are done almost,In step 3 we are checking if the file already exists or not. If it doesn’t exist, we get a reference to the file embedded in the Visual Studio project (called people.db) and then we copy it in the local storage (that is mapped with the object (ApplicationData.Current.LocalFolder). This way the file is copied in the root of the local storage.Now the most important question is...
4.1: How to perform all SQLite CRUID operations on existing database?
To access to the database and perform queries: it’s important to remember that the name of the classes that identify the database tables should have the same name of the tables in the database we’ve imported.
In previous post, table columns structure is: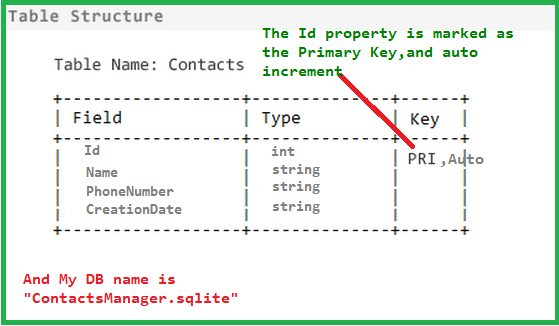
So here to work with existing database file(ContactsManager.sqlite).The name of the classes that identify the database tables should have the same name of the tables in the database we’ve imported .Class members should be like this:
Testing with existing database file:
Now we can use the same code we’ve seen in the previous post.
5.1) To read all contacts from existing database file(ContactsManager.sqlite):
To read selected contact:
var currentcontact = Db_Helper.ReadContact(Selected_ContactId);//Read selected DB contact
5.2) To insert new contact to existing dabase:


Visitors Note:The only difference between previous and current post is in 'App.xaml.cs' file at 'Application_Launching' Event. if you are looking for SQlite sample for windowsphone store 8.1.You may visit this link :)
FeedBack Note: Please share your thoughts,what you think about this post,Is this post really helpful for you?otherwise it would be very happy ,if you have any thoughts for to implement this requirement in any another way?I always welcome if you drop comments on this post and it would be impressive.
- private async Task CopyDatabase()
- {
- bool isDatabaseExisting = false;
- try
- {
- StorageFile storageFile = await ApplicationData.Current.LocalFolder.GetFileAsync("ContactsManager.sqlite");
- isDatabaseExisting = true;
- }
- catch
- {
- isDatabaseExisting = false;
- }
- if (!isDatabaseExisting)
- {
- StorageFile databaseFile = await Package.Current.InstalledLocation.GetFileAsync("ContactsManager.sqlite");
- await databaseFile.CopyAsync(ApplicationData.Current.LocalFolder);
- }
- }
However call above method in App.xaml.cs
- private async void Application_Launching(object sender, LaunchingEventArgs e)
- {
- CopyDatabase();
- }
Step 4:
Now we are done almost,In step 3 we are checking if the file already exists or not. If it doesn’t exist, we get a reference to the file embedded in the Visual Studio project (called people.db) and then we copy it in the local storage (that is mapped with the object (ApplicationData.Current.LocalFolder). This way the file is copied in the root of the local storage.Now the most important question is...
4.1: How to perform all SQLite CRUID operations on existing database?
To access to the database and perform queries: it’s important to remember that the name of the classes that identify the database tables should have the same name of the tables in the database we’ve imported.
In previous post, table columns structure is:
So here to work with existing database file(ContactsManager.sqlite).The name of the classes that identify the database tables should have the same name of the tables in the database we’ve imported .Class members should be like this:
- public class Contacts
- {
- //The Id property is marked as the Primary Key
- [SQLite.PrimaryKey, SQLite.AutoIncrement]
- public int Id { get; set; }
- public string Name { get; set; }
- public string PhoneNumber { get; set; }
- public string CreationDate { get; set; }
- public Contacts()
- {
- //empty constructor
- }
- public Contacts(string name, string phone_no)
- {
- Name = name;
- PhoneNumber = phone_no;
- CreationDate = DateTime.Now.ToString();
- }
- }
Testing with existing database file:
Now we can use the same code we’ve seen in the previous post.
5.1) To read all contacts from existing database file(ContactsManager.sqlite):
- private void ReadContactList_Loaded(object sender, RoutedEventArgs e)
- {
- ReadAllContactsList dbcontacts = new ReadAllContactsList();
- DB_ContactList = dbcontacts.GetAllContacts();//Get all DB contacts
- listBoxobj.ItemsSource = DB_ContactList.OrderByDescending(i => i.Id).ToList();//Binding DB data to LISTBOX and Latest contact ID can Display first.
- }
To read selected contact:
var currentcontact = Db_Helper.ReadContact(Selected_ContactId);//Read selected DB contact
5.2) To insert new contact to existing dabase:
- DatabaseHelperClass Db_Helper = new DatabaseHelperClass();//Creating object for DatabaseHelperClass.cs from ViewModel/DatabaseHelperClass.cs
- Db_Helper.Insert(new Contacts(NametxtBx.Text, PhonetxtBx.Text));//Adding new contact
Let's see the new contact in db file by using step 1,
Like this we can perform all SQLite operations(Create,Read,Update,Insert,delete) as same like previous article.If you are still confused on performing sqlite queries ,you can download the sample to understand this article.
Visitors Note:The only difference between previous and current post is in 'App.xaml.cs' file at 'Application_Launching' Event. if you are looking for SQlite sample for windowsphone store 8.1.You may visit this link :)
FeedBack Note: Please share your thoughts,what you think about this post,Is this post really helpful for you?otherwise it would be very happy ,if you have any thoughts for to implement this requirement in any another way?I always welcome if you drop comments on this post and it would be impressive.
thank you very much sir for this blog sir..:)
ReplyDeleteThanx for article and your exellent blog!
ReplyDeleteWhy I can't see method Application_Launching or event launching in my App.xaml.cs Sir. Which instead ?
ReplyDelete